As businesses become increasingly data-driven, everyone expects insights from the products they use: How many people on my team log in? How do we use the product? What’s the ROI?
You may already capture data that’s valuable to your users, but it doesn’t provide any value if it’s tucked away in your data warehouse or BI tool. By embedding analytics within your product, you create an entirely new offering – a data product – that upgrades your user experience, unlocks new revenue streams, and positions your company as a data-driven organization.
However, embedding analytics into your product from scratch can be time-consuming, complex, and costly. With Omni’s embedded analytics, you can leverage the data work you’re already doing to ship customer-facing data products faster. Our out-of-the-box visualizations, robust security controls, and custom theming make it possible to build a complete embedded analytics product in an afternoon.
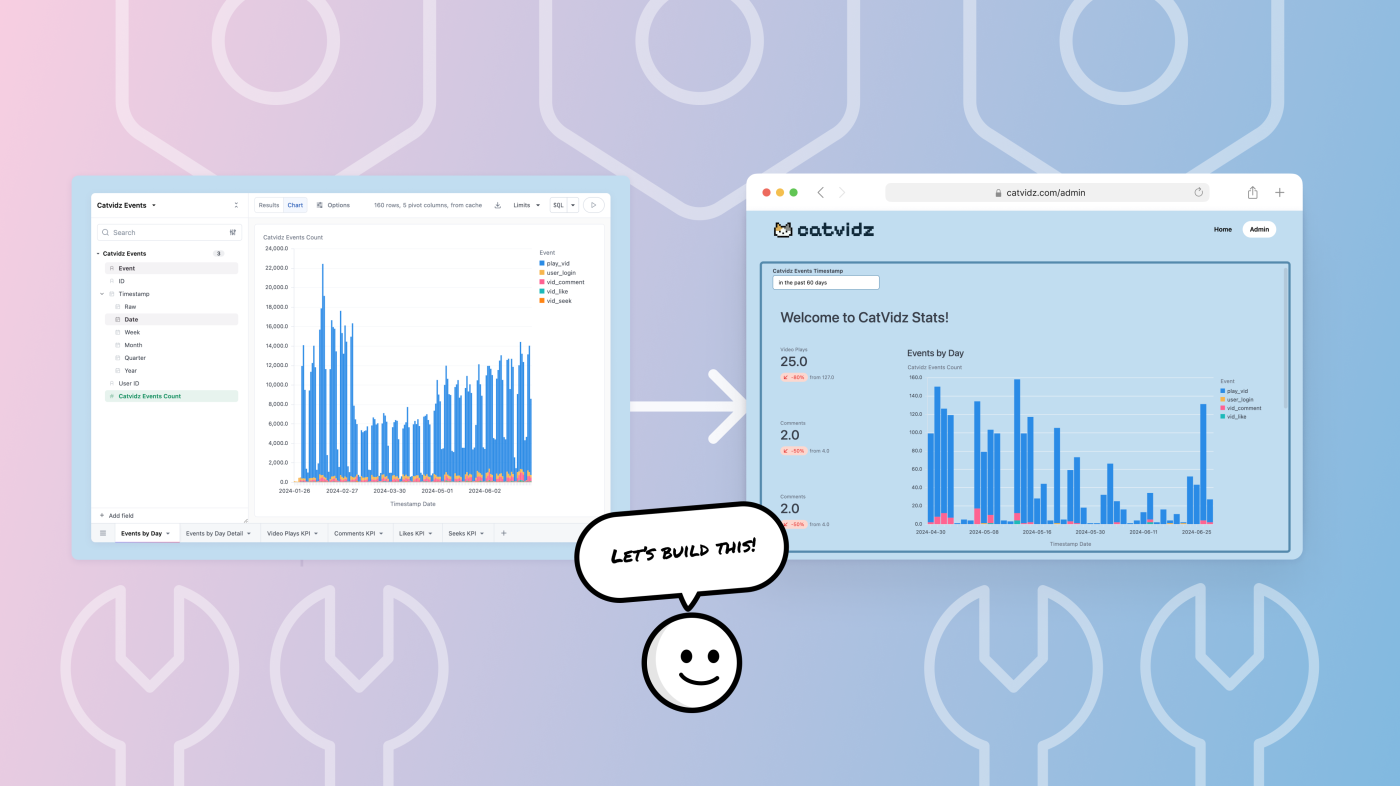
For real! That’s exactly what our CTO, Chris, and Solutions Engineer, Jack, did during a recent LinkedIn Live session: they spun up an embedded dashboard in less than 30 minutes using Omni. The result was an “Admin” section on our fictional website, Catvidz, that lets video creators view detailed stats on their published videos.
In this blog, I’ll walk through the steps we took to build that data product, including:
Building visualizations and dashboards in Omni
Setting up access filters (so users can only see their data)
Embedding your dashboard into your product using Omni’s embed SDK
Building visualizations and dashboards in Omni #
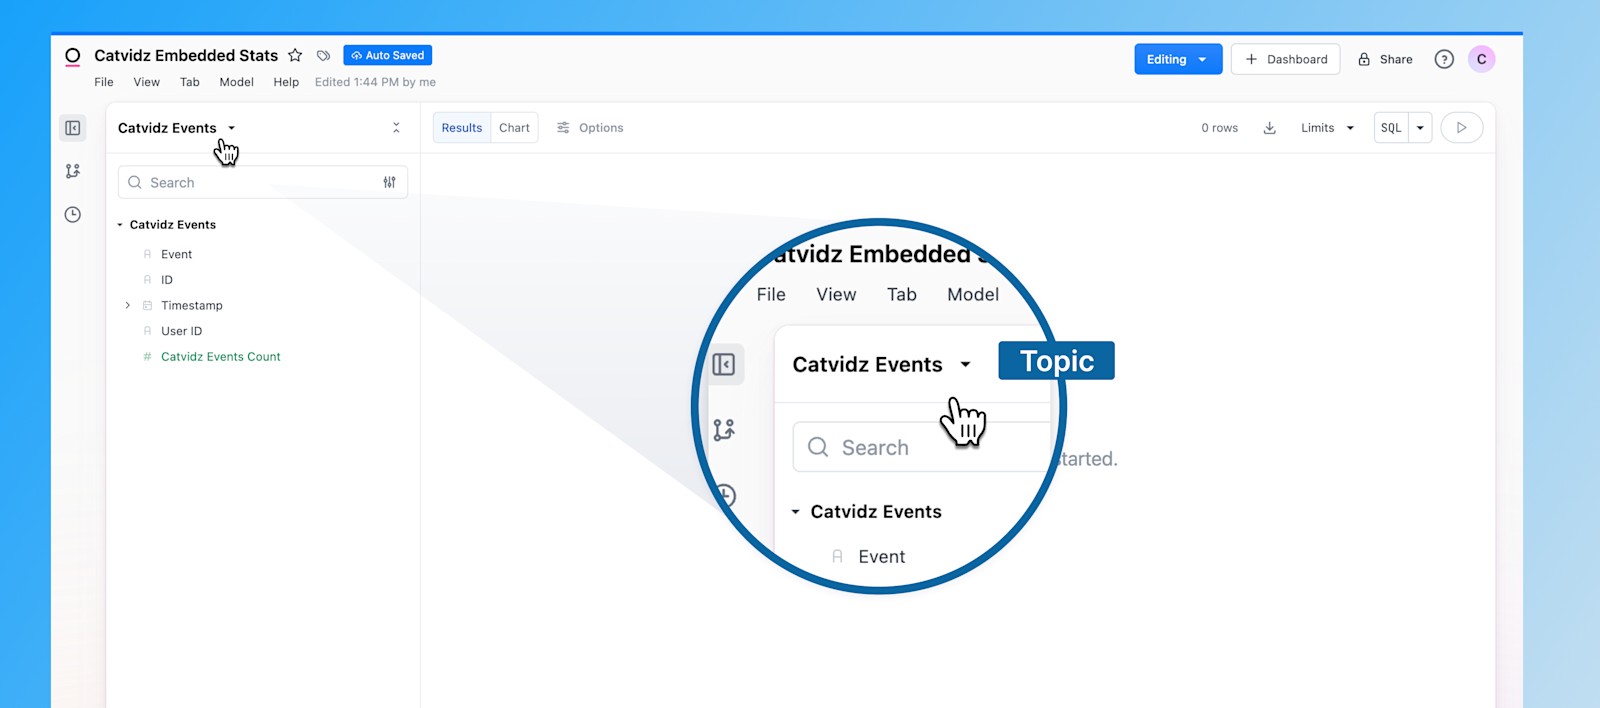
We started by opening up an Omni workbook. The data is stored in a table called Catvidz Events, and we’ve turned this table into a Topic. Topics let us curate the querying experience in Omni, such as applying default filters or configuring access filters (which are crucial for ensuring that users see their data only – more on that later).
(Note: You might already curate this product usage data internally. This data can serve double-duty by surfacing these metrics and trends to your customers!)
We built out a few simple visualizations to put on the dashboard:
A bar chart showing the types of events per day
A table to see additional detail on events
Some KPI visualizations to highlight daily stats for our users
(Note: If you’ve already created these visualizations internally, you can easily repurpose them for your embedded dashboard using Omni’s Copy tab to existing workbook feature.)
Then, with our visualizations ready, we flipped to the dashboard view. To tune things up, we arranged the tiles, removed the background so they’d blend into our website background, and added a filter to let users choose the time period they’d like to see. And with that, our dashboard was complete!
Setting up access filters #
However, if we were to embed our dashboard without any security controls, each video creator would be able to see everyone’s data. 😬 Instead, we’d like users to see only data corresponding to their own videos.
We achieved this in Omni using access filters. Access filters enable “row-level security,” ensuring that only users with the right permissions can view specific rows in a table. In our example, this means a video creator would only see a row of event data related to one of their videos.
There were 2 quick steps to this:
1. Setting up a user attribute
We defined a user attribute
Catvidz Userto store each user’sCatvidz Account ID. Later, I’ll explain how this value gets assigned programmatically by your application. For now, we just need to create a user attribute to reference when defining the access filter.

2. Defining the access filter in the model IDE
We popped open the underlying data model and navigated to the
Catvidz EventsTopic we’d previously defined. In the Topic definition, we added a few lines to create an access filter:
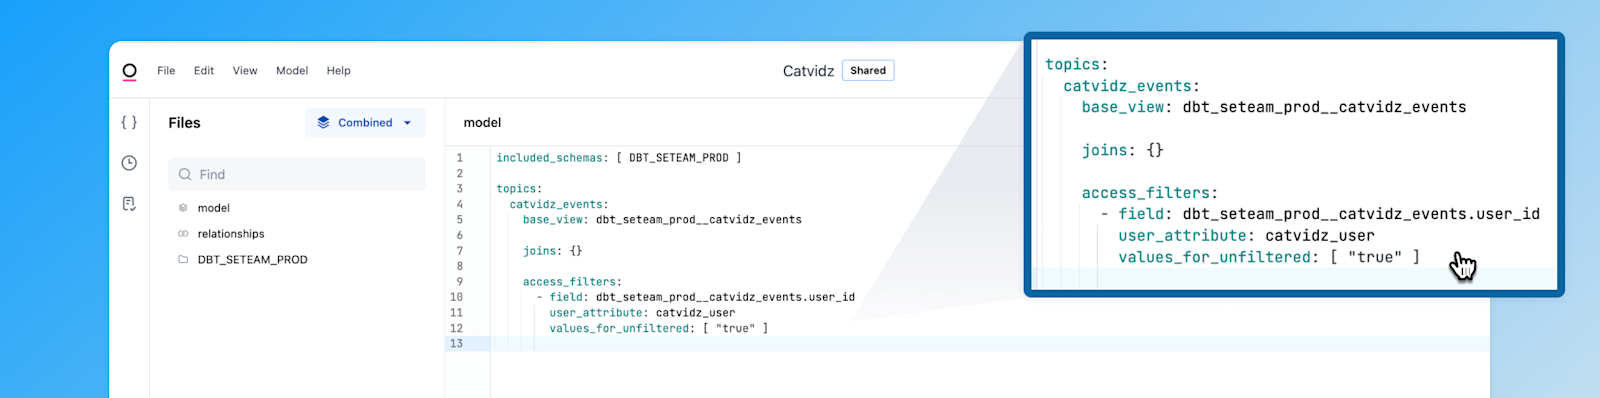
Here, we’re telling Omni: “In the
Catvidz EventsTopic, only let users see rows where theuser_idfield in theCatvidz Eventstable matches their assigned value for thecatvidz_useruser attribute.” (And, if yourcatvidz_uservalue = “true”,you can bypass this access filter and see all rows in this topic.)
Now that our dashboard is properly secured, we’re ready to bring it into our product!
Embedding the dashboard into our product (using Omni’s embed SDK) #
This part of the process gets a bit more technical, but it’s ultimately only a few function calls. Here’s a bit more about the implementation behind-the-scenes:
Custom URLs: Embedding dashboards with Omni works by generating a custom URL per user to render in an iframe. That URL encodes information like the dashboard ID, user ID, and relevant user attributes to ensure they only see the content you want them to.
URL Secret: That URL also gets signed with a “secret,” a unique key within your Omni environment to ensure that only your team can embed your dashboard.
CSS Properties: Finally, you can also pass CSS properties into the URL to customize the appearance of the dashboard in your iframe.
During the LinkedIn Live, we walked through what the technical implementation looks like in our Catvidz source code (🚨highly proprietary, pls don’t steal 🚨):
We utilized our Typescript SDK to generate that embed URL with a script, but you can also create it manually. You can find more details on both methods in our docs.
As Chris mentioned live, what ties everything together is the programmatic assignment of user attributes. When you create the custom URL, you’re telling Omni how to translate some user attributes from your application into user attributes in Omni. That way, Omni knows how to filter your data appropriately for that user. (In our case, we’re telling Omni to assign the user’s ID to the catvidz_user user attribute in Omni.)
Once you have your URL-generation function set up, you can call it in your browser-side code that creates the iframe in your application and defines your end user experience. This is what ours looks like – it calls the Loader function above to define a variable iframeUrl, and this URL gets rendered in the iframe:
Alright – let’s take a step back and see what we’ve created!
What we built #
In less than 30 minutes, here’s what we built: an embedded dashboard where video creators can see detailed stats on their videos, complete with the Catvidz theme, filter functionality, and proper security controls to ensure users see only their data.

To recap what’s happening behind the scenes, let’s walk through an example:
Context: You’re a video creator who posts videos to Catvidz. Your Catvidz Account ID is 123.
Data: When someone interacts with your video, a new row gets created in
Catvidz Event Datawith a user_id value of 123.Backend: When you log into your Catvidz admin page, a custom URL gets generated and rendered within an iframe. This URL renders a specific dashboard with only your data in it.
In the backend, Catvidz maps your Catvidz Account ID (123) to the Omni user attribute
catvidz_user. Omni then knows, “Oh! You’re user 123, so I’ll show you data on videos by user 123.”
Interactivity: As a user, you’re free to add filters, drill into any aggregates, and export the data to use in another application.
Shipping a new product in an afternoon #
As a data or product person, you’re often combing through data in search of a hidden product opportunity. With embedded analytics, your data becomes the product opportunity itself – and you can deliver that product to users in no time with Omni.
We’ve loved working with customers like PrimaryBid to create their data products. If you’re interested in seeing how Omni can help you deliver value to your users with data, we’d love to show you.